

This blog post is about how to draw an object or a face or whatsoever in front of you, not from a photo! As you have seen I did NOT go to the zoo either!
Instead I enrolled in an 8-weeks drawing class. I went there for several reasons:
1. I wanted to get back into drawing again which I had been doing forever. Well, nearly.
2. The course seemed to be providing good instructions, as in practical guidelines on how to get any object on paper or canvas in the CORRECT proportions. Whatever we perceive as correct. Or realistic, for that matter.
3. The class was going to be held in the middle of the Museum which is a very nice venue, with normal visitors walking around as well. It’s kind of entertaining. For everybody.
The teacher was very good and actually delivered the drawing instructions as advertised. And plenty of them!
The instructions partly came with the recommendation of certain chapters of the book Drawing on the Right Side of the Brain by Betty Edwards, HarperCollins 2008, for further reading (see link end of post) which I had already at home but hadn’t made use of. I did read it, though!!! I think I saw it in some libraries as well. So no excuse!
Proportions and Interesting Famous Examples
What I liked most of all the instructions during the class was on how to deal with proportions. Like getting a face right or different sorts of flowers in proportion to each other, like sunflowers and carnations together. Some are “slightly” bigger than others.
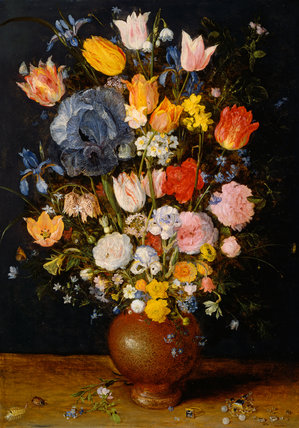
Jan Brueghel the Elder (1568-1625)
(Photo by courtesy of www.fitzwilliamprints.com/image/703003/a-stoneware-vase-of-flowers-by-jan-brueghel-the-elder)
In this lovely picture the big greyish-blue Iris on the top left focal point is a bit out of proportion to the other flowers, like the tulips and the roses. Jan Brueghel wasn’t too particular about those proportions, according to Celia Fisher in Blumen – 40 Meisterwerke von Dürer bis Dali [Flowers – 40 Master Pieces from Dürer to Dali], Berlin 2012, p. 19.
The early flower painters (mainly from the 17th century onwards) generally did not care as much about the right size, let alone about the flowering times. They put them all happily together: tulips (spring flowers) with peonies, carnations and roses (summer flowers). No problem! As long as they looked nice enough, which they do! And nobody is perfect, right?!?

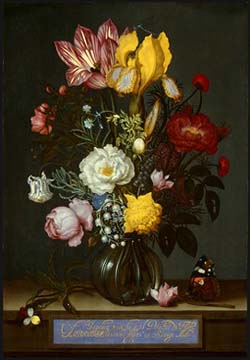
Ambrosius Bosschaert the Elder Ambrosius Bosschaert the Younger (1573-1625) (1609-1645)
(Photo Bosschaert the Elder by courtesy of www.nga.gov/feature/artnation/still_life/bosschaert_1.shtm)
(Photo Bosschaert the Younger by courtesy of www.imamuseum.org/blog/2014/05/05/flowers-still-life-and-still-living/)
And yes!, these two above are related as in father and son. Big family business that was. But look at the flower mix.
How to Get It Right (fairly!)
Well, maybe they didn’t know it back then (???) but there is a simple way of getting these proportions right. Or fairly right.
Just grab your pencil and hold it straight upright with your arm fully stretched out in front of you and straight ahead of yourself. Stretched and straight ahead are important so the pencil has always the same distance to your eyes and your object. Then measure with one eye closed the distance e.g. from the eyebrows to the tip of the nose, from the tip of the nose to the bottom of the chin etc.
More detailed: The bottom end (easier) of your vertically held pencil is at the eyebrows. Measure down to the tip of the nose and put your thumb there. This measurement you transfer to your drawing.
Depending on what you are measuring, you obviously hold the pencil sometimes horizontally or at any angle. It should always be on a pretty straight plane. Some people use the clock to get the angles fairly correct using the big hand to go round and the small one is on either 6 or 12 o’clock or on 9 or 3 o’clock. You get my drift!
Some people find it easier to start with the overall size of the object, others just start somewhere and add bit by bit. Whatever works best for you.
Homework Examples
As we also got homework, I did a few drawings according to instructions and found those very useful. It didn’t always work perfectly for me. In that case I went by what looks and feels best. I ended up with some really decent pencil portraits of patient sitters like this little softy:


I had my desklamp on him to cast a decent shadow. That would better bring him out and increase the contrasts. This makes him more three-dimensional as well as giving him some space. (And keeps him warm, too, right? Bit of summer sun!!!)
Just be flexible with your methods. The main thing is you get there.
Construction Lines
I also used a lot of thin pale lines for eyes and shoulders and the likes because they are not always horizontal but always in line of each other. Do use a ruler for these “construction” lines! Makes life easier. You can rub them out later, most of them anyway.
For that your best bet is a putty eraser. These are so much softer and gentler on the paper and still do a great job. You can even rub off pastels on paper. You get them in most office material shops and of course art material shops.
Some examples for the construction lines:


Same photo left and right, I just made the right one darker to better bring out the lines for feet, hips, eyes etc. for demonstration purposes. See how a lot of them are parallel to each other? See also the bottom of the red jacket? Another parallel. Just observe your object closely and you’ll get there.

This is my Romeo (wild man!), another example for the construction lines. He is a big yoke. The construction lines are very pale. I wouldn’t have managed without.
Other portraits and objects:


Here is a fluffy gorilla on the left and some cubes (from a different class) on the right with plenty of different angles. The main job with the cubes is to get the angles right and the shadows to bring out the objects. All of them were white.

Cyclamen plant: A separate preliminary drawing

and a brush and ink rendition which I did about a year later.
Never throw away a drawing whether you think it is good or bad. (https://modern-art-and-photography-henning.de/2016/06/06/cyclamen)

Another drawing from that class and not the best, BUT look down below how it worked out so far with the pastels.

I haven’t finished this one yet but the hands are far better here. To finish it off, I need to go to the museum again to check out the folds of the cloak and other bits. The lady (who is unpainted in the museum) was holding her baby which got lost, unfortunately.
You see: You can always improve things later if it doesn’t work out right away. And there IS ALWAYS room for improvement!!! Don’t give up. Just take it easy.
For more objects in pastels or acrylics you can look through my blog at
https://modern-art-and-photography-henning.de including:
Wild Ivy in Brown Jug https://modern-art-and-photography-henning.de/2016/05/23/wild-ivy-in-brown-jug-for-sale
Luxurient Bouquet https://modern-art-and-photography-henning.de/2016/05/07/luxurient-bouquet-for-sale
Flowers in the Night https://modern-art-and-photography-henning.de/2016/04/30/flowers-in-the-night
Vibrant Colours – Flowers, Fruit, Vegetables (incl. info on start of flowers in paintings) https://modern-art-and-photography-henning.de/2016/02/05/vibrant-colours-flowers-fruit-vegetables
or just visit my website for a browse: arthenning.com
Link to Betty Edwards, Drawing on the Right Side of the Brain: aimeeknight.files.wordpress.com/…/edwards-the-new-drawing-on-the-right-side-of-the-brain-viny.pdf

2 thoughts on “How to Draw – Portrait of an Elephant”